Azure DevOps: Multi-Stage Release Pipelines with YAML
- Defining multiple deployment stages
- Using templates to generalize deployment logic
- Managing deployment environments
- Tool support for writing YAML code
- Final thoughts
In this post a simplistic build and release pipeline is created that consists of three stages: build, QA deployment, and production deployment. The definition of the pipeline using YAML allows to manage and version the pipeline alongside the source code it deploys. From my personal experience, the change history of a classic pipeline that defined using the visual designer is usually not very helpful because it contains too much clutter. Introducing changes using the visual designer often takes several iterations of updating and testing until it works as intended. Each iteration will be listed in the pipeline’s history, making it harder to investigate bugs retrospectively. The declarative approach using YAML allows to utilize feature branches. When the update work is completed, the associated commits can be squashed into a single commit.
This blog post does not cover how to manage variables or secrets within Azure DevOps or Azure Key Vault.
In the Azure DevOps menu a classic pipeline is split across the Pipelines, and the Releases menu items (see Fig. 1). Under Pipelines you define how the code is built and under Releases you use a trigger to deploy the builds to several environments.
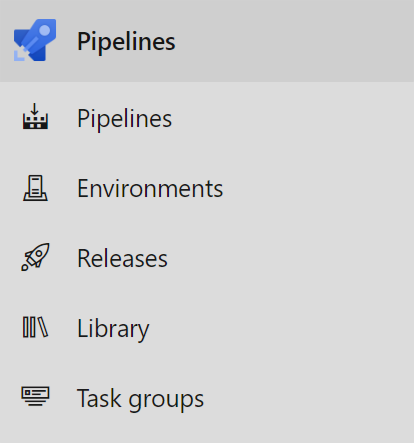 Fig. 1: Cropped part of Azure DevOps pipelines menu
Using a YAML pipeline, the Releases menu item is now obsolete because you define the whole pipeline – from build stage to production deployment – in the Pipelines menu, most likely in the same YAML file. To view the deployed (or failed) releases, you now use the Environments menu where all releases are grouped by their targeted environment.
When you crate your first YAML pipeline in Azure DevOps it looks something like the following, which is builds an ASP.NET application based on the .NET Framework.
1
2
3
4
5
6
7
8
9
10
11
12
13
14
15
16
17
18
19
20
21
22
23
trigger:
- master
pool:
  name: default
variables:
  solution: '**/*.sln'
  buildPlatform: 'Any CPU'
  buildConfiguration: 'Release'
steps:
- task: NuGetToolInstaller@1
- task: NuGetCommand@2
  inputs:
    restoreSolution: '$(solution)'
- task: VSBuild@1
  inputs:
    solution: '$(solution)'
    msbuildArgs: '/p:DeployOnBuild=true /p:WebPublishMethod=Package /p:PackageAsSingleFile=true /p:SkipInvalidConfigurations=true /p:PackageLocation="$(build.artifactStagingDirectory)"'
    platform: '$(buildPlatform)'
    configuration: '$(buildConfiguration)'
- task: VSTest@2
  inputs:
    platform: '$(buildPlatform)'
    configuration: '$(buildConfiguration)'
As already known from the classic pipelines, $(myVariable) is the syntax for variables that are passed into the pipeline when it is executed.
This is the equivalent to this classic pipeline in the visual designer:
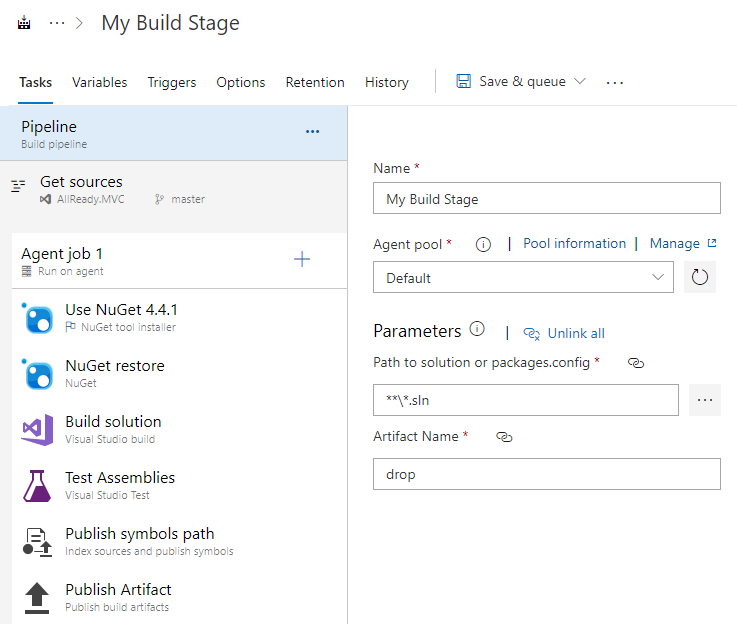 Fig. 2: Classic pipeline in the visual designer
Defining multiple deployment stages
As one could see in the classic pipeline definition above (Fig. 2), a Task (e.g. Use NuGet 4.4.1) is part of an agent job (here Agent job 1). Agent jobs again are belong to a stage (here My Build Stage). A pipeline, which is the root element in this structure, is comprised of multiple stages, which might depend on each other.
Conceptually, a YAML pipeline is structured in the same way. The reason why the above YAML definition is missing the definition of stages and jobs is because it is only required if you want to run multiple jobs or stages. If not specified Azure DevOps will run your tasks as part of a default job and default stage. Therefore, an exemplary pipeline could be structured like this:
| Pipeline | ||||||
|---|---|---|---|---|---|---|
| Stage | Stage | |||||
| Job | Job | Job | ||||
| Task | Task | Task | Task |
In the following example, a simple pipeline is defined that runs the following consecutive stages: Build, QA, and Production, where QA and Production deploy to their respective environment. As you can see, here it is needed to explicitly define stages and jobs.
1
2
3
4
5
6
7
8
9
10
11
12
13
14
15
16
17
18
19
20
21
22
23
24
25
26
27
28
29
30
31
32
33
34
35
36
37
38
39
40
41
42
43
44
45
46
47
48
49
50
51
52
53
54
55
56
57
58
59
60
61
62
63
64
# azure-pipelines.yml

trigger:
- master
pool:
  name: default
variables:
  solution: '**/*.sln'
  buildPlatform: 'Any CPU'
  buildConfiguration: 'Release'
  subscription: 'MPN Enterprise VSTS Subscription'
  artifactName: 'drop'

stages:
- stage: Build
  jobs:
  - job: Build
    steps:
    - task: NuGetToolInstaller@1
    - task: NuGetCommand@2
      inputs:
        restoreSolution: '$(solution)'
    - task: VSBuild@1
      inputs:
        solution: '$(solution)'
        msbuildArgs: >-
          /p:DeployOnBuild=true
          /p:WebPublishMethod=Package
          /p:PackageAsSingleFile=true
          /p:SkipInvalidConfigurations=true
          /p:PackageLocation="$(Build.ArtifactStagingDirectory)"
        platform: '$(buildPlatform)'
        configuration: '$(buildConfiguration)'
    - task: VSTest@2
      inputs:
        platform: '$(buildPlatform)'
        configuration: '$(buildConfiguration)'
    - task: PublishBuildArtifacts@1
      inputs:
        PathtoPublish: '$(Build.ArtifactStagingDirectory)'
        ArtifactName: $(artifactName)
        publishLocation: 'Container'

- stage: QA
  dependsOn: Build
  variables:
    Environment: QA
  jobs:
  - template: deploy-appservice-template.yml
    parameters:
      environment: ${{ variables.environment }}
      webAppName: my-azure-app-service-qa
      subscription: $(subscription)

- stage: Production
  dependsOn: QA
  variables:
    Environment: Production
  jobs:
  - template: deploy-appservice-template.yml
    parameters:
      environment: ${{ variables.environment }}
      webAppName: my-azure-app-service-prod
      subscription: $(subscription)
The attribute dependsOn creates a dependency graph between the pipelines and requires the predecessor of a stage to succeed before it is run. If you compare it to the classic pipeline from the visual designer, you will see that the Publish Artifact task is not used. The reason for this is because artifacts are published automatically for the next stage to consume them. The following stage download these artifacts automatically, too. But be careful, there is a difference between the Download Artifacts task, and utilizing the automatic download: the Download Artifacts task downloads the artifacts into the ./a/ subdirectory, but the automatic download will place the artifacts into the root directory – so, one directory level above.
Additionally, on line 26 YAML’s block chomping indicator >- is used to bring all msbuildArgs in a more readable format. This will remove all new lines from the multi-line string.
Using templates to generalize deployment logic
As you can see on lines 49 and 60 in azure-pipelines.yml, we use a template that contains the specifics how the built artifacts are deployed to the QA stage and production stage, respectively. This mitigates the risk of introducing errors when updating the deployment declaration for both stages. Although this generalization is also possible with classic pipelines using Task groups, this can become convoluted and hard to manage quickly.
1
2
3
4
5
6
7
8
9
10
11
12
13
14
15
16
17
18
19
20
21
22
23
24
# deploy-appservice-template.yml

parameters:
- name: environment # don't pass run-time variables
- name: webAppName
- name: subscription
- name: artifactName
  default: drop

jobs:
- deployment: DeployAppService
  environment: ${{ parameters.environment }}
  strategy:
    runOnce:
      deploy:
        steps:
        - task: AzureRmWebAppDeployment@4
          inputs:
            ConnectionType: 'AzureRM'
            azureSubscription: ${{ parameters.subscription }}
            appType: 'webApp'
            WebAppName: ${{ parameters.webAppName }}
            packageForLinux: '$(Pipeline.Workspace)/${{ parameters.artifactName }}/**/*.zip'
            enableXmlVariableSubstitution: true
Above, the referenced template deploy-appservice-template.yml is shown. Each stage that references this template passes parameters to the template in order to configure it accordingly. For instance, webAppName specifies the name of the Azure App Service resource where the application is deployed to. This simple template only consists of a single deployment job.
Managing deployment environments
This deployment job is a special kind of job that integrates with the above mentioned Pipeline Environments menu. There, each executed deployment job can be viewed grouped by the environment it is deployed to. You don’t have to create this environment by hand in the Environments menu, if the environment name specified in the deployment job (see line 12) does not yet exist, it is created automatically.
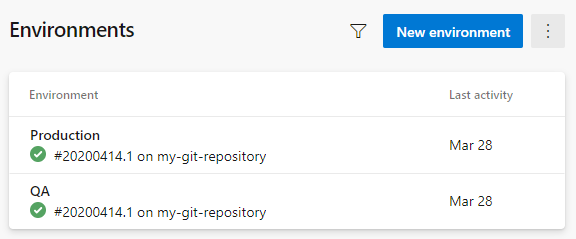 Fig. 3: Overview of the automatically created environments in the Environments menu
If you want to have a deployment approved before rolling it out to production, it is possible do so via the Environments menu. Click on the environment you want to have approved and select Approvals and checks in the collapsed menu button as shown in Fig. 4:
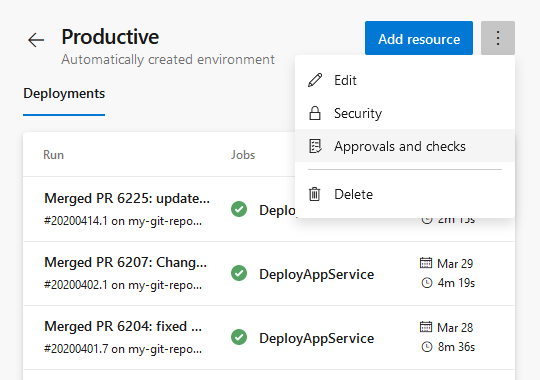 Fig. 4: Setting the approval process for an environment
In case you’re having troubles receiving notifications for pending approvals, you have to add a new subscription in the notification settings. Klick New subscription, select the Release category and as a template choose An approval for a deployment is pending.
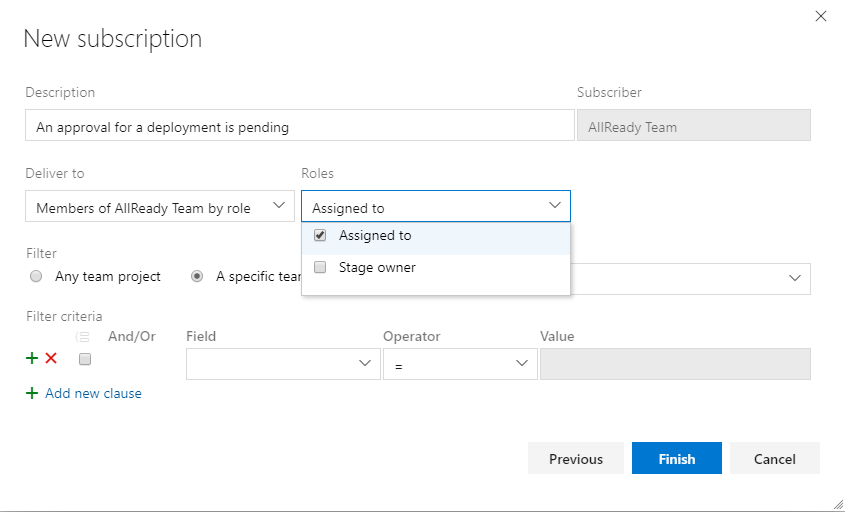 Fig. 5: Adding a new subscription for approval notifications
Please note: the value passed as the environment name must be present at template evaluation time. Therefore, run-time variables – these are used in the form of $(myRuntimeVar) – passed as the template parameter ‘environment’ will not work. If a run-time variable is passed by mistake, the environment of the deployment job will default to ‘Test’ (current implementation of deployment job).
As you might have noticed in azure-pipelines.yml on lines 51 and 62, we don’t use the runtime-syntax – in the form of $(environment) – to pass the variable as the environment parameter. Instead, we use a so called expression: ${{ variables.environment }}. The reason for that is how Azure processes a pipeline run: before starting a run, all environments in which a pipeline deploys into are authorized. Therefore, their names must be available before processing the run. If you use runtime variables to set the environment names, these variables are not yet available. As a result, the environment name defaults to Test. So, if you find yourself wondering why all your deployments are associated to a Test environment, you can fix this by using pipeline variables in expression syntax. This works because expressions are evaluated before the environments are authorized.
1
2
3
4
5
6
  # snippet from above azure-pipelines.yml

  jobs:
  - template: deploy-appservice-template.yml
    parameters:
      environment: ${{ variables.environment }}
Tool support for writing YAML code
Being used to the visual designer, the plain YAML declaration might leaves one wondering how to correctly specify all properties of a task. Since nobody wants to look up the correct syntax every time, tooling support is highly appreciated. Luckily, the integrated YAML editor in Azure DevOps provides an assistant. Simply click on the small Settings link, and a configuration panel will appear on the right. Make sure you keep the text selection on the left before clicking Add, otherwise a new task is added to the YAML file instead of applying the changes to the initial task.
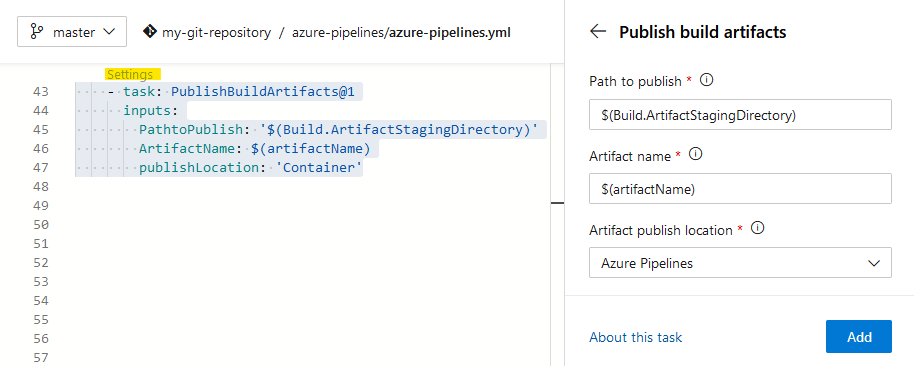 Fig. 6: Using the assistant panel to configure a task
A downside of the assistant is that it does only work for your “main” YAML file, but not for the templates we created.
There is also a VS Code extension for Azure Pipelines that you might want to check out.
Final thoughts
Using YAML to define pipelines is great since you can use version control to manage its history. Using templates to generalize deployment logic improves maintainability and allows you to keep staging and production environments as identical as possible without having to update them separately. This also helps to reduce errors that would be introduced by missing to update all stages.
I hope you enjoyed this blog post, found it useful, or maybe if it helped you in your process of implementing a YAML pipeline. I’m open to your thoughts on this subject, or how to improve this post. Thank you!
Title photo by JJ Ying
 Dominik Zöchbauer